

Date Published
June 8, 2026
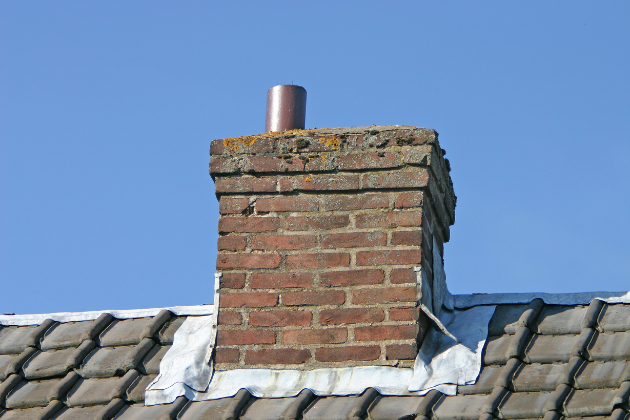
Leaks around chimneys and where a roof meets walls are often caused by failing lead flashing. Left too long, a small drip can turn into damp patches, damaged plaster and even electrical risks, so it helps to know what to look for and what a proper repair involves.
Lead flashing is designed to create a waterproof junction where your roof meets a chimney, wall or dormer. When any part of this system fails, water finds the easiest path into your home, often far from the actual leak.
A typical chimney or roof-to-wall detail will have several parts working together:
Where a pitched roof runs into a wall or dormer, similar details are used, so leaks here are often caused by the same problems as around chimneys.
Lead itself can last many decades if it is correctly installed, but it is not indestructible. Movement in the building, weather and poor detailing can all shorten its life.
Common causes of failure include:
Lead splits and cracks occur when the lead sheet is too long or too rigid, so it cannot move with temperature changes. Over time it fatigues and splits, usually along bends or where it is fixed too tightly.
Inadequate laps happen when one piece of lead does not overlap the next by a sufficient distance. Strong wind or heavy rain can then drive water up and under the joint, especially at chimney abutments and around dormers.
Failed sealant is an issue where sealant has been used in the joint between the lead and masonry instead of a proper mortar or lead wedge fixing. Sealant perishes, peels away and leaves a gap for water.
Mortar chase problems arise when the groove in the brickwork (the chase) is too shallow, poorly cut or not properly packed. Mortar can crack and drop out, freeing the flashing so it lifts in the wind.
On chimney stacks, leaks often begin where the side flashing meets the roof at the lowest point of the slope. Water naturally gathers here and can quickly exploit even a small weakness in the soakers or stepped flashing.
The front of the chimney is another frequent trouble spot. If the apron flashing is too short, sits too flat, or lacks a good overlap with the tiles or slates, water can run behind it and show up as damp on the chimney breast inside.
Where a roof meets a wall or dormer, leaks often start at junctions and corners. Any poorly detailed joint, missing soaker or cut tile can channel water into the property rather than away from it.
Water staining does not always appear directly behind the chimney or wall. It can track along timber or plasterboard before becoming visible, which is why early clues are worth noting.
Common signs include:
If you notice damp near a chimney or where your roof meets a wall, it is sensible to have the flashing checked before plaster and timber suffer long-term damage.
A competent roofer will start with a visual inspection from outside, often backed up by a look in the loft. They will assess both the condition of the lead and the way the whole junction has been detailed.
Key checks typically include:
Lead condition: looking for splits, cracks, pinholes, excessive rippling and signs that the lead pieces are too long or wrongly fixed.
Laps and overlaps: checking that stepped flashing and apron flashing have sufficient overlap with each other and with the roof covering, and that water naturally sheds away from the junction.
Sealant and mortar: inspecting the mortar chase for gaps or loose sections and noting any areas where sealant has been used as the main waterproofing, which is rarely adequate on its own.
Soakers and underlying support: lifting tiles or slates where appropriate to confirm that soakers are present, correctly sized and not corroded, and that the surrounding timbers have not decayed.
It can be tempting to apply a bead of sealant or a coat of roof paint over a leak and hope for the best. In practice, these materials break down under UV light and movement, and often peel away within a season or two.
Sealant can sometimes be used as a temporary patch in an emergency, but it should not be relied on as the main repair. Proper flashing work involves secure fixing into the masonry and correctly lapped pieces of lead, not just a surface smear.
Simply using heavier lead will not solve problems caused by poor design. If the laps are too short or the chase is badly cut, even the best grade of lead will eventually leak.
Good detailing allows the roof to shed water efficiently while letting the lead move slightly with temperature changes. This balance is what delivers a long-lasting, reliable junction around chimneys and walls.
If you have an active leak, it is important to limit the damage indoors while you wait for a roofer. Simple steps can greatly reduce the impact on plaster, flooring and electrics.
Start by containing the water. Place buckets or trays under drips, and move furniture, rugs and electrical items out of the affected area.
Next, encourage ventilation. Open windows when safe to do so and gently warm the room to help damp areas dry out. Avoid blasting saturated plaster or ceilings with high heat, which can cause cracking.
Always check nearby electrics. If water is close to light fittings, sockets or switches, turn off the relevant circuit at the consumer unit and avoid using the affected points until a qualified person has checked them.
Lead flashing around chimneys, walls and dormers is a small part of your roof but it plays a big role in keeping your home dry. Dealing with issues early can prevent far more disruptive and costly repairs later on.
If you have noticed damp near a chimney, party wall or roof-to-wall junction, or you can see cracked or loose lead from the ground, it is time to arrange a professional inspection. For experienced help with chimney services and thorough roof repairs, contact Northpoint Roofing & Maintenance on 07586316614to book an assessment and discuss the best long-term fix for your property.
Contact Northpoint Roofing & Maintenance for reliable roofing services with no deposit required and payment due only on completion.